Cranberry Walnut Bread
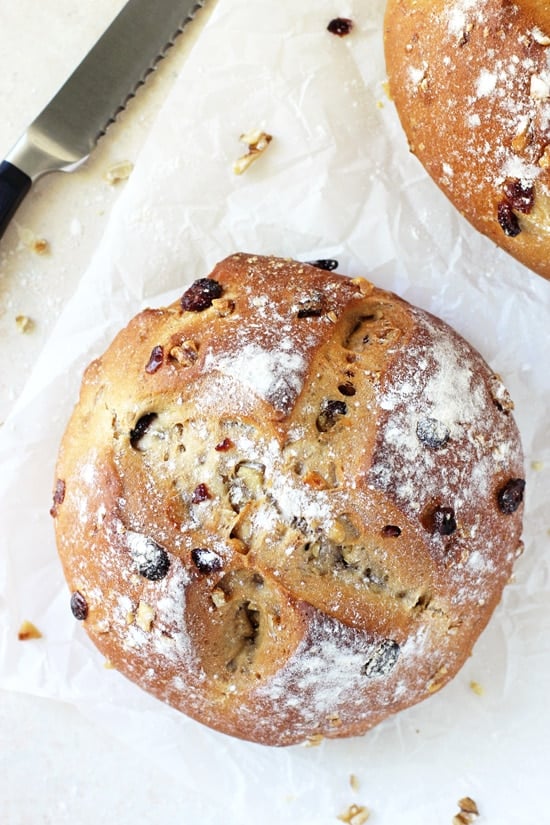
Sturdy, soft and chewy, this cranberry walnut bread makes for the best toast! And it’s freezer-friendly. So save yourself some money and make this store-bought holiday staple at home! Dairy free and vegetarian.
This cranberry walnut bread was originally posted in November 2012. The post has been updated as of November 2, 2017 with new photos, text and improved recipe instructions.
It’s cranberry walnut season! More specifically, cranberry walnut bread season.
And here’s how it usually goes down. You’re walking through the bakery aisle of your local grocery store and cranberry walnut goodness is calling out to you from every which way.
But wait! Stop right there. Before you make any decisions, let me first re-introduce you to this homemade version of the popular holiday bread.
Which, might I add, makes enough dough for two really good size loaves. So essentially, it’s two for the price of one. I mean seriously, why are the limited edition breads they sell at the store so dang expensive?
ANYWAY. Expensiveness aside, this homemade version also puts those store-bought ones to shame in the flavor department. And will absolutely have you smitten.
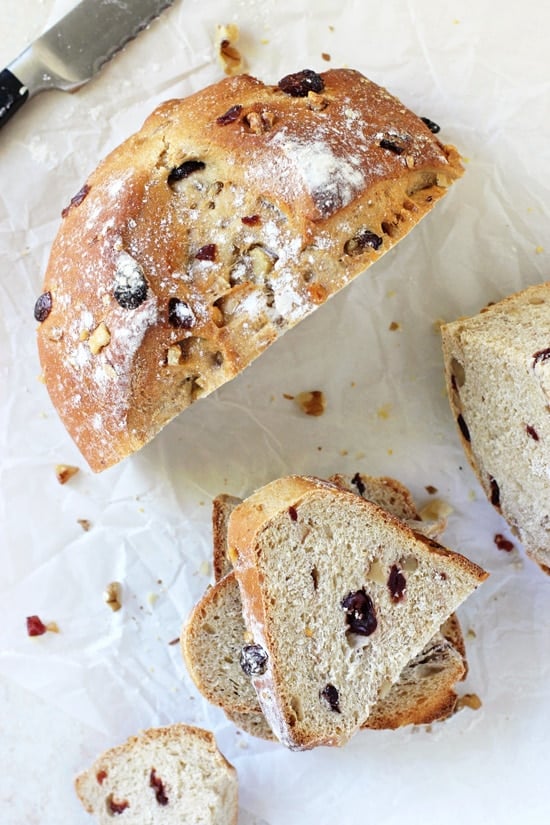
The loaves bake up perfectly study, perfectly soft and are filled with jusssst the right amount of mix-ins.
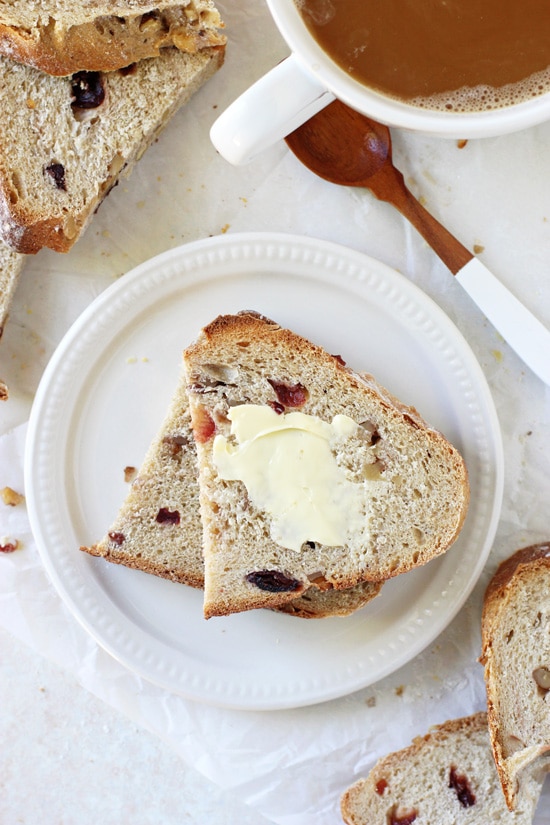
Added bonus? This bread is highly toast-able. As in, it makes for just about the best toast ever.
Perfectly crisp on the outside, perfectly chewy and soft on the inside, with a touch of sweetness from some honey and the cranberries, AND that hint of crunch from the walnuts.
It’s a carb-lovers dream.
Tips & Tricks For This Cranberry Walnut Bread
- This bread freezes beauuuutifully. We tend to go through a whole lotta bread during the holidays when we have family staying with us, so I love to keep a few loaves in the freezer to thaw out as needed. If freezing, let the bread cool completely, then wrap in plastic wrap and place in a large freezer-safe baggie. You can also slice the bread and then freeze.
- I have successfully substituted on numerous occasions 1 ½ to 2 cups of the all-purpose flour with white whole wheat flour (not regular whole wheat flour) without any change in the overall texture of the final product.
- Along those lines, when measuring your flour, be sure to scoop it with a spoon into your measuring cup and then level off with the back of a knife. If you dunk your cup into your flour bag, you’ll likely use too much and the dough will be too heavy / dry.
- Keep in mind that the exact rise time for the dough can vary slightly based on the temperature and humidity in your house. Ideally, you want to find a nice warm spot for the dough to rise.
- And finally, the base of this bread is a complete go-to of mine. So if you’re not feeling the cranberry walnut combo, you can absolutely use other mix-ins or even leave plain. One of my favorite combinations? Minced fresh rosemary and black pepper – SO GOOD.
Additional Bread Recipes You Might Enjoy:
- Homemade Cranberry Walnut English Muffins
- Quicker Cinnamon Raisin Bread
- Pumpkin Cinnamon Swirl Bread
- Lemon Thyme English Muffin Bread
- Fresh Herb Dinner Rolls
- Multigrain Rolls
Did you make this recipe? Rate and review it down below! I’d love to hear from you.
Cranberry Walnut Bread
Sturdy, soft and chewy, this cranberry walnut bread makes for the best toast! And it’s freezer-friendly. So save yourself some money and make this store-bought holiday staple at home! Dairy free and vegetarian.
Ingredients
- 1 ½ cups warm water (105 to 115ºF)
- 1 tablespoon active dry yeast
- about 6 cups all-purpose flour, divided
- ½ cup honey
- ¼ cup olive oil
- 1 ½ teaspoons salt
- 1 teaspoon ground cinnamon
- ¾ to 1 cup dried cranberries
- ¾ to 1 cup chopped raw walnuts
Instructions
- To the bowl of a stand mixer fitted with the paddle attachment,* add the warm water then sprinkle in the yeast. Next, add in ½ cup of the flour and mix briefly on low speed to combine. Let the mixture sit for 10 minutes to proof the yeast.
- Add in the honey, olive oil, salt and cinnamon and mix briefly again on low to combine.
- With the mixer on low speed, slowly add in the remaining 5 ½ cups of the flour, about 1 cup at a time (SEE NOTES**). Once the dough forms a shaggy mass, stop the mixer and switch to the dough hook.
- Knead on low speed for about 3 to 5 minutes, until the dough is smooth and elastic (if the dough is too sticky, slowly add in additional flour until it reaches the desired consistency).
- Shape the dough into a ball and place in a large lightly oiled bowl. Turn once to coat, then cover with plastic wrap or a clean kitchen towel. Allow the dough to rise until it has doubled in bulk, about 1 ½ to 2 hours.
- Line a large baking sheet with parchment paper, then sprinkle lightly with cornmeal. Set aside.
- Gently deflate the dough and transfer to a lightly floured surface. Knead in the cranberries and walnuts by hand.
- Split the dough into two equal sized pieces and form each into a ball about 5 to 6 inches in diameter. Place both on the prepared baking sheet, then cover with a damp towel(s) and let rise again for another 30 to 45 minutes, until puffy.
- Meanwhile, preheat the oven to 350ºF. Once the loaves have proofed, sprinkle the tops lightly with flour, then use a serrated knife to cut a cross into the top of each loaf (about 1-inch deep).
- Bake for about 35 to 45 minutes, until golden brown and the loaves sound hollow when tapped on the bottom (if you have an instant-read thermometer, the internal temperature should be about 190ºF). Transfer the loaves to a wire rack to cool before slicing!
Notes
*The amount of dough for this recipe works best in a 6 quart stand mixer (or larger). I have made it in a 5 quart stand mixer - although it really pushes the capacity of the bowl. Alternatively, you can mix everything in a large bowl and then knead the bread completely by hand!
**If you find that your dough won't take the full 6 cups of flour that's okay. For most people this recipe works exactly as written, but humidity and other factors in your house can affect the moisture level of the dough. You want your dough to be smooth and elastic after kneading, so add as much flour as needed to reach this consistency (go by feel!). With that said, this dough should be a bit sturdier than traditional bread dough, so keep that in mind when kneading.
Adapted from King Arthur Flour
Nutrition Information:
Yield: 24 Serving Size: 1Amount Per Serving: Calories: 206Total Fat: 6gSaturated Fat: 1gTrans Fat: 0gUnsaturated Fat: 5gCholesterol: 0mgSodium: 134mgCarbohydrates: 36gFiber: 2gSugar: 11gProtein: 4g
Nutrition data shown is an estimate provided by an online calculator and is for informational purposes only. It should not be considered a substitute for a medical professional’s advice.



I saved this recipe early when I originally signed up for Pinterest, so it was at the bottom of my lengthy bread recipes. Oh.My.Goodness!!! I’m so glad I found this! The bread is delicious! It’s most definitely going to be made multiple times! Thank you! Oh, I might mention, I was in a hurry, apparently, and didn’t read through the directions before I started, so I added the nut and cranberries at the end of the 1st kneeling cycle. It worked beautifully!
This made my day! So happy to hear it Becky 🙂
Made one loaf. It lasted about 1.5 days! So then I decided to make two. However I did use whole wheat flour, not white wheat with only 1cup of all purpose and the bread was delicious! The second time around I used 4 cups whole wheat, 1 cup buckwheat and 1 cup all purpose. I doubled the cinnamon. It is delish.
Love this! Thanks so much for letting me know Carol!
I absolutely LOVED your bread. My only problem was with getting the cranberries and walnuts evenly incorporated after the first proofing. Next time I will add during the machine kneading step like one of your other commenters suggested. This bread is going to be a wintertime staple at my house! Thank you!
So happy to hear this Kathleen! Thank you for taking the time to let me know 🙂
Can I bake this recipe in a dutch oven? I hear all about the flavor so hoping you have advice
Hi Rada – I think it could be done I just haven’t tested it myself since I always make the two loaves and only have one dutch oven. You might need to play around with the cook / oven time. It’s hard to say since I haven’t tried it in a dutch oven myself!
Made this recipe yesterday. So good!!!! I’ve read all the comments and you suggest 1/4 C Rosemary and 1/2 t of pepper. That doesn’t sound like a lot of pepper for two loaves. Is it possible that is a typo?Thanks for such a great and easy recipe.
Love this! So glad you enjoyed Charlene. Not a typo – just what I personally use! I don’t dig too much pepper so you can definitely experiment with the amount 🙂
My whole extended family loves this bread and they ask me to make it every Thanksgiving and Christmas! My goal is to make enough that I can have some toasted with butter for breakfast the next day! Just fabulous! Thank you!
Love this! Thanks so much for letting me know Sarah! 🙂
I made this bread the other day and it was fabulous, everyone enjoyed it. The only thing I struggled with was converting cups into grams or ounces. There are so many different charts that give different amounts, any ideas what I should use?
Hey Sue – So glad you all enjoyed! I’m not super familiar with converting between the two so unfortunately I’m not sure which chart would be best. Sorry I can’t be of more help!
I made this and it was awesome – two loaves finished in a day!I used bread flour and instant yeast which made it even easier. I added the berries and nuts towards the end of my kneading via my kenwood mixer. The bread turned out perfect – moist with the right sweetness from the honey and tangy-ness from the cranberries, and crunch from the walnuts. Not so good news for the keto-fanatics because this is very hard to resist. 🙂
haha I love this! So so happy to hear you enjoyed the bread Gina! Thanks for letting me know 🙂
I made this bread yesterday and I’m already putting the ingredients on my shopping list to make again next week!The taste is divine and texture is so beautiful!I made it with pecans as I didn’t have walnuts and added some pumpkin seeds too!Thank you for sharing here!
Oh I love this! Thanks so much for taking the time to let me know 🙂
I just made this bread 2days ago and I’m making it again today this bread is AMAZING and so so easy to make the only thing I did different was to shape into loaves the directions were perfect and anyone who tried it thought it was store bought I can’t rave about this bread enough thank you for publishing this recipe I’m sure it will be made in my house often n for many years to come thank you again , I also have a roadside farm market in which I do a lot of canning and baking for my store I do believe this may be added to the menu Thanks again carol bakes
So so happy to hear how much you enjoy the bread Carol! Thanks for letting me know 🙂
great recipe. i made it last night for thanksgiving. I don’t like walnuts, so i used pistachios instead. i also added lemon zest. cant wait for family to try it.
Oh I love those changes! So glad you enjoyed the bread!
I am new at baking bread. I made the bread by hand and it work out well and tasted great. I cut the recipe in half, as there is just the two of us. It didn’t seem to be an issues. My problem was with the cross cutting of an inch deep. I had four high peaks that made it difficult to cut. Am I misunderstanding that part of the recipe.
Glad to hear you enjoyed! So before you slice in the cross, the bread should be a smooth ball (so I’m not sure what you mean by peaks??).
Has anyone baked this recipe in loaf pans rather than shaping them into rounds?
Hey Jolene – I haven’t tried it myself. I think it should work (although the bake time may vary and the crust will be a bit different from baking in the pan).
This bread it nothing short of amazing! I truly love making bread and this one does not disappoint! My mom tried to hide the loaf I made for her from my dad because she wanted to keep it all to herself! He found it and devoured it! LOL! I guess her first mind was right! Thank you for a great recipe! I did only use about 5 cups of flour. Looking at how the dough’s texture and consistency was after the fifth cup made me stop there. We live in VERY humid Houston, and it’s May so that could be the reason! I’m about to pull 2 loaves out the oven as I type! Thank you Again,Anthonette
haha oh my gosh I love this! How funny! Thanks so much for taking the time to let me know!
Made this bread today for first time ! I am a new baker just this year and it was very easy to follow and turned out delicious! Made it just as called for and it was perfect! Thanks so much !
I’m so happy to hear this! Thanks so much for letting me know 🙂
Made the bread again today! Haven’t cut into into it yet though! My top (except for the cut area) seems much smoother than your picture. Yours looks nice and crunchy – did you put any oil or anything on top of the dough before going in oven to make it like that?
Hey Debbie! I think that’s just the way it looks in the photos … I wouldn’t say it’s super crunchy on the outside as written. Something you might want to try that I do when I make sourdough is to put the loaves directly on the oven rack for the last 10 minutes of baking. I haven’t done it with these loaves but it may help make the crust a bit more crispy!
I just made this recipe. WOW – is it good. It tastes just like I hoped it would taste. Dense, chewy with a little bit of crust. Just a hint of sweetness. I used my bread machine for the first kneading and added the cranberries at the beginning. The cranberries were evenly distributed throughout the dough. I didn’t add walnuts because I didn’t have any. I used part all-purpose white flour and part WW flour. I made it late the afternoon and the dough did not have enough time to rise sufficiently before I went to bed. So I put in the refrigerator overnight and took it out the next morning. I let it come to room temperature and then, because it was a cold day, I put it in the oven with the oven light on for heat. Worked great! A wonderful recipe that can be changed with different ingredients. Thank you!
Love this! Thanks so much for letting me know Pam – and for sharing those changes!
I’ve made this bread twice in the past week (it was SO good) and the first time I kneaded the cranberries and walnuts in as described in the recipe. I found that it was challenging to incorporate them into the dough. The second time I added them at the beginning of the process while I was using the dough hook to knead and the bread came out perfectly. By adding the cranberries and nuts during the machine kneading, the ingredients were more evenly distributed in the bread. LOVE this recipe!
So happy to hear you enjoy the bread! And thanks for sharing – that’s great to know.
Best.bread.ever! Have made it several times and it’s always perfect. Wondering how to substitute instant yeast for active dry…any suggestions? If so, how much instant yeast? Any other changes as a result to using instant yeast?
Oh I’m so happy to hear it! And yes, you could definitely substitute instant yeast. This article from Cook’s Illustrated is helpful for conversions between the two: https://www.cooksillustrated.com/how_tos/6620-yeast-types
You also won’t need to proof the yeast – so I’d add the warm water and yeast to the bowl, give it a mix for a few seconds and then add in the honey, olive oil, etc. And add in the 1/2 cup flour when you do the rest of the flour. Let me know if that doesn’t make sense!
Made it tonight and it was the best bread I’ve ever made in a while. Recipe made 2 loaves and they were perfect!
I love this! So happy to hear you enjoyed it Beth!
Has anyone considered fresh cranberries or does that ruin the moisture balance? They look so pretty in my cranberry cake bread, so I wanted to try it, but I’m running out of time (it’s Christmas Eve and I want it for breakfast tomorrow).
Thanks,
Kari
Hey Kari! I haven’t ever tried it with fresh cranberries (I tend to stay away from fresh fruit in yeasted bread because of the moisture – my guess is it will affect it in some way).
Hi, I would love to make this recipe. Can I substitute the honey with maple syrup/agave/cane sugar?
I think maple syrup or agave would work just fine. If you use cane sugar you’d have to adjust the other ingredients as it would change the dough consistency (so I wouldn’t recommend it)!
I’m very excited to try out this recipe! There’s only one store in my town that offers cranberry walnut bread but it sells out so quickly, I rarely am able to get my hands on it. I’m curious… have you ever made rolls instead of loaves, and if so, what modifications were required? Also, I’d love to try the rosemary/black pepper variation. What measurements of each would you suggest? Thanks so much!
Hey Megan! I haven’t ever made this dough into rolls but I think it could work. You could try shaping / baking them like I do with these rolls: https://cooknourishbliss.com/2012/09/26/honey-yeast-rolls/ (but again I haven’t tried it myself so I’m not totally sure what would be best). And I’d estimate I use about 1/4 cup minced fresh rosemary and about 1/2 teaspoon black pepper. Enjoy!
This bread was absolutely amazing! I may use slightly less cinnamon next time though. I don’t have a mixer so I kneaded by hand and the texture was great! We had our last slice today, so I’m whipping up a version using black pepper and rosemary as suggested. Thank you for a simple and delicious bread recipe.
So happy to hear this Brooke! Thanks so much for taking the time to let me know.
Although many have said the recipe as-is worked for them, I don’t see any way possible that amount of flour could be accurate given the wet ingredients. I don’t think I even got a full 4 cups of flour into the dough (I did substitute whole wheat – the intent was to sub 1/2 whole wheat with 1./2 white bread flour). The taste is good – dense texture. Will definitely be working on “tweaks.”
Hey Lori! It is a lot more flour than I normally use but it does bake up a bit more dense / sturdy than a typical bread. With that said, I do think it’s best to go by feel with homemade bread – it varies for me quite a bit depending on the humidity etc in my house on a given day!
Turned out great.
So happy to hear it Peg! Thanks for taking the time to let me know.
Loved this recipe! Came out great the first time. I just purchased a Dutch oven. Do you think I can bake it in there to get a crispier crust?
Hey Liz! So happy to hear you enjoyed it! I think it could be done I just haven’t tried it myself (since I always make the two loaves and only have one dutch oven!). You might need to play around with the cook / oven time (it’s hard to say since I haven’t tested it that way).
Loved it! Used the brown sugar instead of honey, so I had to add more liquid to get the right texture. My husband and kids really enjoyed it. I’m looking forward to make more to share with my family and friends.
So happy to hear this!! Thanks so much for taking the time to let me know! 🙂
are you sure the recipe is correct? 6 cups flour to 1.5 cups water is way below the recommended 5:3 ratio
Hey Jonathan – yep, it’s correct as written. I agree with you that it’s more flour than normal and I’ve made it with less (about 5 cups I’d guess). But there’s something about it that I think tastes better with more flour – it’s sturdier and toasts better. But as with all breads it’s definitely best to go by feel as it can vary on the humidity etc in the house.
Maybe it was beginners luck when I made this, but my husband loves it! Says it’s better than Panera’s. Time to make another 2 loaves! Thank you for the recipe.
haha so happy to hear this Carol! It’s a favorite at our house! Thanks for letting me know!
This looks so good but it looks like a lot of bread. Could I halve the recipe?
Hey Amy! Yes, you could absolutely halve the recipe. It also freezes really well (so I usually stick one loaf in the freezer as soon as it’s cooled!).
Hi Ashley just made this bread and it’s so delicious!! I was just wondering if you have any tips on what way to store it to keep it fresh so it doesn’t go hard the next day? Thanks!!
Hey Laura! I’m so glad you enjoyed it!! Thanks so much for letting me know!
So I do one of two things. One – I slice the bread and then store in a ziplock baggie just on the counter at room temp (and then toast slices when ready to enjoy – I find it still tastes great this way for about four-ish days). Or two – I slice the bread and then freeze in a ziplock baggie (and then just pop slices straight from the freezer to the toaster when ready to eat (adding a smidge of extra time) – tastes almost exactly like it did when fresh this way!
Just made this bread … do you think you could add the fruit and nits before the first rise… it’s hard to combine the fruit in the loaf after it’s proofed?
Hey Jenn! I’ve considered it a few times (because it would definitely be easier to mix in that way!). My concern is that the amount of mix-ins might make the dough so heavy that it will affect the proofing… which has held me off from trying it.
i just made my ist ever bread and i am so happy with this recipe!! thank you so much i could do it again!! easy and sooo yummy!! luv it!!
Oh I love this! So happy to hear you enjoyed the bread Mae! 🙂
I just made this bread for the second time and both times I’ve had problems adding the full amount of flour. After about 4 cups the dough seems to refuse to take any more and becomes very crumbly. I’ve add more warm water to get the dough to stick together but it becomes really tough. It tastes very good but is definitely more dense than it should be. Any thoughts on where I’m going wrong?
Hey Rachel! So a few thoughts … how are you measuring your flour? I like to fluff the flour up in the bag / container, then scoop with a spoon into the measuring cup and then level off with the back of a knife. If you’re dunking the cup into the bag you’re likely using too much (and the crumbly dough makes it sound like there’s too much flour). The other thing is that the humidity in your house will affect the dough (so exactly how much flour you need to add can vary a bit – it’s definitely best to go by feel! You want it have that smooth and elastic consistency).
Hi! Could you bake this bread in a Dutch oven? Or is it better to just bake on a pan? Thanks!
Hey Erika! Good question … I’ve only baked this bread on the baking sheet (since it makes the two loaves and I only have one dutch oven!). That said, you could definitely experiment with baking it in a dutch oven, but I couldn’t say for sure how it would turn out!
love this bread, I used your recipe ran out of honey so used brown sugar instead. I also added ginger and nutmeg. I baked 8 loafs for friends and neighbors, they all love it. Thanks for posting this. I am going to try the Pepper and Rosemary next. I do have a question have you put apple sauce in this mix to sub for sugar?? just wondering if it would work.
Hey Sherry! Oh I’m so happy to hear this! Made me smile 🙂 Oooo that’s a good question – I’ve never used applesauce myself in this bread. It might work (although I’m not 100% positive!) – but you may need to add more or less flour to feel (you want the dough to be smooth / elastic and not super tacky after kneading). Definitely let me know if you try that out – I’d love to know how it goes! Happy holidays!
Hello !! Thank you for the great receipe !! Do you think i can susbtitute de honey to make it less sweet ? Or to add parmessan cheese and how much do i have to add. Regards from Nicaragua
Hey Maria! If it was me, I would leave the honey in the bread (since it would be a bit difficult to substitute it out). The bread isn’t crazy sweet or anything. I’ve made this with rosemary / black pepper as mix-ins instead of the cranberries / walnuts (and left the honey in) and it definitely didn’t feel sweet that way! And yes! You could absolutely add in some parmesan cheese! I’d say start with maybe about 1/2 cup and then you could always adjust in the future!
Omg !! You are so sweet ! Than you!! I’ll take your advice.
You’re very welcome!
Hello! I am currently in India and just made tthis bread…. I must say many members of my extended family were very skeptical, said it would be as good as the bread they get from the local bakery etc. But I was determined and made it, no cranberries were available so I substituted with raisins. Not only did the house small amazing, the loaves turned out amazing and I have won over my in-laws with your delicious recipe!!!
They all now want to eat only this bread! Thank you for helping me get into everyones heart through your delicious recipe!!!
Anita this completely made my day! Especially since this bread is a HUGE favorite of mine – it makes me so happy to hear that your family loved it as well.
Thank you so much for taking the time to let me know! 🙂
Can you make this in a bread machine?
Hey Ava! I’m not really sure as I don’t have a bread machine. Sorry!
Hello ! Regards from Costa Rica ! Do you think i. can ads dry onion instead of cranberries ? I mean make it Salty ? Or add parmesan cheese ? Thanks for this wonderful bread !
Hi Maria! Absolutely. The cranberries and walnuts can definitely be subbed out for other mix-ins of your choice! Hope you enjoy!
Hi. I love this bread! I’m new at baking breads, actually it’s my first time to bake a bread. Hehe. One question though, can I let the dough sit overnight & bake it the next morning? Thanks & more power to you!
Well thank you! Baking bread is so much fun! (well, at least I think so!) I haven’t tried it myself with this recipe specifically, but you could try leaving it in the fridge overnight (that will help slow down the yeast – if you just leave it out at room temp it will rise way too much!). A quick google search will explain a bit further how to do this 🙂
Hello again! I just made it this morning and it was perfect! To think I just baked it in my oven toaster and the house smelled devine! Thanks again & will be making more of your recipes soon! Keep them coming.
Oh I’m so happy to hear it!! Thank you for letting me know!
Cranberry Walnut Bread comes around for several months of the year at the local New Seasons, but it’s become so expensive that I don’t buy it anymore. This loaf looks a lot like it. I’ll have to give it a try using some white wheat. Thanks for sharing.
I hate that it only comes out during certain times of the year – making it at home solves that problem 🙂
This bread looks absolutely delicious and I hope we have some cranberries on hand.
Thanks Jill!
YUM! This looks delicious! And I love that you use honey instead of sugar in your bread. I’m going to try to make this whole wheat this weekend!
Thanks Sara! Hope you enjoy!
Made a half recipe today. It turned out great! I subbed molasses for honey. Yum! Thanks for sharing!
So happy to hear this! I’m going to have to try using molasses in it next time!
Oh such beautiful pictures! I agree with you I doesn’t matter how good the bakery is sometimes even the simplest homemade bread tastes better than their most elaborate loaf!
I just found your blog and I really like your recipes and photographs! I would like to add it to my blog roll if it is ok with you off course. 🙂
Thanks
Maria
Hi Maria – of course, I’m glad you like it! Exactly – there’s just something about homemade bread… so good : )
Oh this looks so good! I love the flavor combination, AND your beautiful pictures!
Thanks Jess!